Monday, December 9, 2019

Holiday Activities To Get You To The Break!


Just 16 days until Christmas and 10 more days of school until the break! 
Here are a few sites that might help you make it to through the next two weeks, and stay on Santa's Nice List!

1. The Reindeer Cam - A live feed of Santa's reindeer with regular appearances made by Santa himself. A scrolling nice list on the site makes it fun and interactive (you can add kids names to the list)! Santa has a few bedtime stories to share, also!

3. Elf Yourself - Upload photos of your kiddos to create dancing elf videos! There are in app purchases and connections to social media sites. Not for students under 13.

4. North Pole -  A website of Christmas themed games, stories and activities. Fun for exploring about Christmas. This app still uses Flash, so you'll need to allow!

5. Why Christmas -  Interesting information about Christmas customs and traditions around the world, created by a Christmas expert!

6. Ultimate Winter Resources for Teachers - Tons of ideas, lesson plans and activities for teachers!

7. Winter Mad Libs by Classroomjr.com - Enjoy some mad libs, puzzles and mazes with a winter theme.

8. 30 Awesome No Tech Games for Christmas - Need some classroom activities that will get your kids up and moving? Here you go!

9. DigiPuzzle has some great Christmas themed online games and puzzles for kids to play. Check to make sure they work on the devices! :) There are ads along the sides of the games, so be careful about clicking!

10. A Kid's Heart Christmas Games that will work on the Chromebooks!

11. Interactive Sites for Education Winter and Christmas games and activities. Lots of things to choose from!

From the Digital Learning Department, We Wish You ALL a Very Merry Christmas and Happy Holidays!

Wednesday, October 30, 2019

Are Those Pesky Chromebook Accessibility Tools Really Useful?


Do your students continually turn on those pesky Chromebook accessibility tools like the onscreen keyboard, or the gigantic mouse, or high contrast mode?  Do those tools help anyone? Does any student really use them? You'd be surprised.

Let's take a look at the purpose behind those pesky little tools.

First of all, how do students turn on the tools? And, maybe more importantly, how do you make them turn them off!

When students click on the bottom right, just as they would when they want to sign off or power down the device, there is an option called Accessibility. By clicking on the icon, students will see all the accessibility tools allowed on the Chromebook and can click the titles to turn them on and off. When there is a green check mark next to the tool, it is on. Click the tool again to turn it off. The check mark goes away. Some tools, when turned on, will show an icon in the bottom right corner next to the date/time/battery icons.


So, who should be using these tools? Many of our students don't need them, but some may find them beneficial. Here is what they do, and who might want to use them!

Enhance Visual Clarity
Screen Magnifier Full Screen or Docked
Full Screen - magnifies the screen.
Docked - separates the screen to magnify where the cursor is.
Students with visual impairments, or teachers who want to show students screen directions.
Adjust Mouse Cursor Size
Makes the cursor arrow huge.
Younger students who struggle to click.
High Contrast Mode
Inverts the colors so backgrounds are black and text is white or color.
Students with visual impairments or light sensitivity.
Highlight Cursor and Text
Cursor: adds a red circle around the cursor

Text: adds a blue circle to text fields
Individuals with low vision or those who have trouble navigating the Chromebook.


Voice Input and Output
ChromeVox
A screen reader - reads everything on the screen.
Students with visual impairments.
Select to Speak
A Chromebook Reader - click the speaker icon in the bottom right and highlight text to be read.
Students who need text read aloud.
Mono Audio
Stereo recordings alternate sounds in both speakers or headphones. Mono makes the full audio sound come from both. So users don’t miss part of the audio.
Students with auditory impairments or who may have impairment in one ear.
Dictation
Chromebook Voice Typing - click the microphone button to have what you say typed on the page.
Slow typers, poor spellers, or those students who need help getting thoughts on paper.


Keyboard Input 
On Screen Keyboard

On the surface, this looks like a regular on screen keyboard. But it has some cool features. 1)It actually lets you draw/write using the squiggly line. (one the top bar across the keyboard. 2) It allows for emojis! (bottom left smiley icon) 3) You can dictate from the keyboard. (microphone icon on top bar)
Students who use eye tracking software to navigate a device. 

Students turn this on all the time, and I don’t think they even know about the cool features!
Automatic Clicks
Turn it on to have whatever the mouse is on be clicked. A circle appears around the cursor and when the circle turns from blue to green, the mouse “clicks”
Students with physical impairment and can’t click buttons, or students who struggle to click.
Sticky Keys
When sticky keys are enabled, a key, when  pressed, becomes “sticky”, and will stay selected for several seconds even after the user moves a finger So, if a students needed to click ctrl + C, the control key, they can click ctrl, make it sticky, and move to click the C.
Students with physical impairments or those who have trouble pressing multiple keys at once.

To learn more about these features, take a look at this blog post by John Sowash! https://www.chrmbook.com/chromebook-accessibility/

Monday, October 14, 2019

Lock Students into Google Forms Quiz!


You've been asking for it. Now it's here! The ability to lock students into a Chrome Browser Window when taking a quiz in a Google Form!

If you haven't already been locking quizzes you give to your kiddos.....keep reading!

While in a Google Form, click the settings gear in the upper right hand corner.

Then click the quizzes tab. The first option in the quizzes tab settings is to make the form a quiz. Once you turn on this feature, the next option is to lock the quiz on Chromebooks.


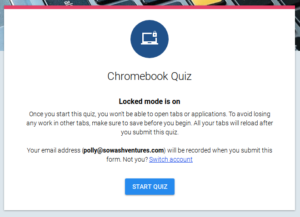
When students open a Google Form Quiz on a Chromebook, they are unable to open or navigate to any other tab on the Chromebook. They will get a warning that "Locked Mode is On." All tabs will reload when the students submit the Form.
Google Forms Locked Quiz mode

During a locked quiz, students will be unable to:

  • Open a new tab
  • Access Chrome apps or extensions
  • Take a screenshot
  • Copy/paste text
  • view page source information

Snap and Read and other Accessibility Tools will still work if a quiz is locked! And the feature is available even when you post the quiz in a Google Classroom class for students! You can even lock a quiz if you make it in a Google Classroom using the same settings options!


Notice, the settings say "Locked Mode on Chromebooks"! This option only works for teachers and students on managed Chromebooks. So if a student brings their own Chromebook and the device is not managed in our Tomball Schools Google Domain, this feature will not work. Nor does it work on tablets or iPads.

So, your cheating worries are over! Well, at least one of them. Give the locked mode in Google Forms a try.

Monday, September 23, 2019

A New Look To AWARE Testing!

As you've probably noticed, AWARE Test Administration has changed! We've been getting a lot of questions about the new look and how to navigate the new features, so here is some great info.  If you are a test creator, we have some additional info on our website along with some quick start directions for Online Testing. Be sure to check those out!  

https://sites.google.com/tomballschools.net/instructionaltechnology/page  

New Test Available Options

To collect the results of an assessment, teachers can choose between a combination of several methods. Teachers have the option to print answer documents, enter student answers manually, administer the test online, or use response pads. Each method will be discussed in this section.
Finding Available Tests
2018-12-17_15-34-48.jpg
From the Analyze Tab, click Test Available.
In the Test Available Tab, all available assessments will be listed under the Test Level. 

2018-12-17_16-16-21.jpg
  • MY Teacher Tests
  • Team Tests
  • School Assessments
  • District Assessments
Printing Answer Documents
Select the printer icon from the list of options available in the test options window. 
2018-12-17_16-22-08.jpgSelect the class period/s that you are printing answer docs for, then click Download Print Document. The file will generate as a PDF. 
2018-12-17_16-24-13.jpg

Entering Students Answers
Teachers can manually enter answers and composition scores as well as Student Inventory scores by selecting the icon pictured below.
For more info on Student Inventories click here
2018-12-18_11-36-45.jpg
Select the class period/s that you are entering answers for.
2018-12-18_11-38-27.jpg
Enter the answers and/or composition scores for each student. Click Save after each student. 2018-12-18_11-39-33.jpg

Activating Online Test Proctoring
Users can activate the Online Test Proctoring feature by selecting the icon below.
Note: This action DOES NOT start online testing or make the test available for students. This feature activates test proctoring only. Online testing must be started on the Online Test Proctoring Page. For more info on Online Test Proctoring click here
2018-12-18_12-02-40.jpg
Once Test Proctoring has been activated, the icon will turn red. This indicates that the assessment is available for Online Test Proctoring
2018-12-18_12-27-06.jpg
Once the Online Testing has been activated, click on the Online Test Proctoring label. 
A class roster list will appear. Click on a class to expand the desired class(es).  Click Select All to activate all students or check/uncheck individual students to determine which students will take the test..  Once the desired student(s) are selected, click the green triangle symbol to make Available (start) or the grey square to make Unavailable (stop). Once the test is started, the gray shape to the left of the student list will turn green and will change from unavailable to available.
Teachers can also monitor the status of students as the online test progresses.
When students are finished taking the test, make sure you come back to this page and click the Stop button.
The bitly for online testing to give to the students in still…   bit.ly//TISDOnline


Friday, September 6, 2019

Are You Archiving??? Google Classroom and Eduphoria AWARE Tests


Are You Archiving???

Every year, you may or may not create Google Classroom Classes or Eduphoria AWARE Teacher or Team Tests (Or campus assessments for those specialists or admins!)

But do you ARCHIVE?

If you don't archive Google Classroom Classes, they stick around on your dashboard, and a lot of times, on the students dashboards.

If you don't archive your AWARE campus or team tests, they hang around on your lists of tests that are available to give to students. That list of tests can get pretty LONG. And you DEFINITELY do NOT want to give the same test to two different years of students. Otherwise, you will see data that includes both years!


ARCHIVE GOOGLE CLASSROOM

To Archive a Google Classroom, open your Classes Dashboard. Find the three dot menu in the top right hand corner of any Classroom Card. In the menu that appears, choose the ARCHIVE option, then choose archive on the dialog box that pops up.


Your Google Classroom will disappear from the Dashboard, but the assignments listed in the Classroom are still saved in your Classroom Folder for the class in Google Drive. You can still choose any assignment from the class to reuse in this years Classroom.


ARCHIVE TESTS IN AWARE

Team or Campus Tests that hang around can cause a lot of problems. To archive a test, open the AWARE Assessments Tab. Find the test you want to archive by drilling down in the left navigation pane. Once you find and open the test, look in the top left corner of the screen to the STATUS options. Click the drop down menu and choose Archived. Refresh your screen and you should now see the test in the Archived Administrations section of the left side navigation pane instead of in the Active Administration. It will also be gone from the list of tests in the Analyze Tab>Tests Available list.


If you need any help archiving, please contact your Digital Learning Coach for support!


Wednesday, August 21, 2019

5 Things You Can Do With Your Document Camera!


Ready for the new school year?

Whether you're still preparing or already in the thick of it, we'll be sending over some Back to School Tips & Tricks over the next few weeks to make the 2019 - 2020 school year the best one yet! Let's get started with 5 FUN things you can do with your document camera:


1. A Fantastic Blended Learning Tool

Are you tired of repeating your mini lessons when practicing group-based learning? Maybe you've found a solution in painstakingly crafting handouts for each group that deliver the curriculum for you. But is this really saving you time?

If you have a document camera sitting around, you could outsmart this hassle by using it to record your mini lessons. Just set up your computer with the recorded explanation, and violĂ ! And if you have access to multiple computers, try recording a mini lesson for each group or station. This will automate your entire lesson, giving you the freedom to float around as additional support where needed.


2. Make a Classroom Vlog

Thanks to platforms like YouTube, millions of creators are now able to share their passions and experiences with the world. And there's a good chance some (if not all) of your students spend hours of their weekly free time on YouTube. In fact, 81% of US parents use YouTube to find content for their children.

A classroom vlog (or video log) is a great way to create a digital portfolio of memories for your students, their parents, and yourself!* Use your document camera to record highlights, scan your student's best work, or let your students create their own segments! And if you're using a Solo 8Plus Document Camera , try using the SlingShot tool to drag and drop content into your favorite programs.

*Just make sure you're not posting these videos publicly for student privacy concerns.


3. Show Manipulatives

Many teachers use manipulatives to drive home simple mathematic concepts for younger students. But sometimes there're not enough sets (or time) for every student to benefit from this hands-on developmental approach.

Consider using your document camera for a live demonstration of the concept as you explain the concept behind it. This will allow every student to see what you're doing on your classroom display. Plus, instead of buying the same manipulative set for each student, this approach allows you to buy several different sets to demonstrate various mathematical concepts.

4. Your Classroom WebCam

It's no secret that students get engaged and excited when you bring in guest speakers such as artists, scientists, or police officers - but travel and scheduling can make these opportunities few and far between.

By combining your document camera with video conferencing software (like Skype, Google Hangouts, or Zoom), you can inspire your students by connecting them with their favorite heroes - no matter the distance! Plus, you can use this same approach to connect your students with their penpals and sister-schools. What a small world!


5. Go Wireless!

Tired of being stuck at your corner desk, AV cart, or interactive panel? Try purchasing a bluetooth mouse and operate your document camera from anywhere in the classroom!

And if your document camera's software includes annotation abilities , you can use a bluetooth mouse to annotate over live or captured media from anywhere in the classroom. Talk about a simple solution to "unstick" yourself from the front of the room!


Thanks for tuning in to HoverCam's Back To School Tips & Tricks
If you can't wait until next week, visit us on social media: